Showing posts with label Metadata API. Show all posts

Thursday, September 27, 2012

Setting up Relationships with other objects in Force.com

Relationship defines how different objects are associated or linked to each other. In Force.com platform, you set up relationships by creating custom relationship fields on an object. While adding new fields to the object, you select the appropriate data type. Master-Detail relationship or Lookup relationship.

Master-Detail Relationship


This type of field creates a parent-child relationship between objects. This relationship field serves in allowing us to achieve many-to-one and many-to-many relationship between objects.

When you are adding a custom field of this type on an object, the object you are adding the field to works as child object. The other object that you select as 'Related To' is the parent. Hence you are creating many-to-one relationship. The child object record's ownership, sharing and security is determined by the parent object record's setting. In fact, the child object doesn't have a owner field. In other words, the child records are owned by the owner of the parent record and also when the parent record is deleted all its child records are deleted as well.

Many-to-Many relationship can also be achieved using the same relationship field. But we need to understand where this field resides. To achieve many-to-many relationship between  two objects we create a custom object called junction object. This junction object is basically like intersection table between two tables in RDBMS. We create two master-detail relationship fields in the junction object to link with the objects for which we want to create many-to-many relationship.


Lookup Relationship


This type of field creates relationship between two objects in a simple form. Using this you can even link an object with itself. Unlike master-detail relationship, this one is loosely coupled and no cascading deletion. In other words, deletion of records in any object has no effect on the other linked object records. The ownership is maintained independently as well.

So, that is how the relationships between the objects are achieved. Go ahead and try out some.

Happy cloud computing using Salesforce!


Monday, September 17, 2012

Add new custom object in Force.com

In one of our previous articles we added new fields to an object. Now let us see how to add a new object. Objects in Force.com platform translate to a database table. New objects are called custom objects.

New object can be added in Force.com platform under App Setup -> Create -> Objects.  Clicking on 'New Custom Object' button on this page takes you to a page where you can enter your new object name and create the custom object. It allows you to enter name and type for 'Record Name' field as well which is a unique identifier for the record. You can set this to auto generate a number in a specific format as well as shown below.


After you create the object, you can setup user access either using Permission Sets or updating the Profiles under Administration Setup -> Manage Users. Look for 'Object Settings' while editing Permission Sets or look for 'Custom Object Permissions' while editing Profiles.

Our new custom object is ready with the standard fields and waiting for all the new custom fields. Go ahead and get working on them as per our article.

Happy cloud computing using Salesforce!

Monday, September 10, 2012

Add new custom fields to object in Force.com

As part of our previous article, we added a simple application and a custom object was automatically created for us.  Now let us explore the platform's each feature at a time as part of our application customization.

Obviously we need to add more fields to our custom object that was automatically created. To begin with let us see what is in there in that object.

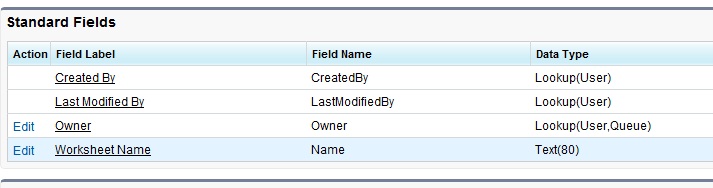
Under App Setup (look in Left Sidebar), expand Create and click on Objects. This will list your Custom Objects and clicking on the object label will display the page where you can see the current definition of the object. As we can see our new object that was automatically created has some standard fields.


To add new fields, look for the area called 'Custom Fields and Relationships' which is right below the 'Standard Fields' section.


The 'New' button here will allow for adding new fields to the object. Adding a new field is a 4 step process.

Step 1. Choose the field Type


In this step you can select the type of field you want to create. For example - Text, Date, Number, etc. There is a list of fields displayed for your selection and the helper text next to it is clearly self-explanatory.


Step 2. Enter the Details 


Here you provide the details of the field like name, helper text, required yes/no, default value etc.


Step 3. Establish field-level security


List of profiles is displayed here and you can assign the visibility of this field to each profile. You can also assign which profile has edit access. Let us explore 'Profile' in the future articles. For now think of a profile as a container of user permissions.


Step 4. Add to page layouts


Indicate on which page this field should be displayed for user interaction. If you are at the very beginning stage like me, there will not be too many page layouts displayed for selection. But it is possible to have many page layouts based on an object and when you add a new field, you can specify which page should include it. The appropriate user interface is added to the field automatically. For example - if it is a Date field, a date pickup calendar is displayed for you in the page layout where the field is displayed.

That was the last step in adding a new field, hit 'Save' and your new field is added. You will see them listed under 'Custom Fields & Relationships' section. Also, check out the pages on which you selected it to be included.

Few clicks while following few steps and we have our new fields added. As simple as that!

Happy cloud computing using Salesforce!
Thursday, September 6, 2012

Force.com Platform Architecture

The powerful Force.com development platform has two unique technologies making a big impact on the functionality of the platform. Multi-tenant Architecture and Metadata-driven development model. Before going further, it is important to learn and understand these two technologies.


Multi-tenant Architecture


Multi-tenancy is an architecture in which a single instance of an application sharing common infrastructure and code base serves multiple users (tenants).  Force.com platform allows developing multi-tenant applications. Users share the same instance and version of the application and all other resources. All users are running on the same code, same database schema, same hardware and operating system. Force.com platform users are given the ability to customize the application and data model. Each user's customization on top of the core application stays as a separate abstract and invisible to other users. Similarly, though the database is shared among users, their data is not seen by each other.


Metadata-driven Development Model


The Force.com platform uses a metadata-driven development model. In this model of development, the functionality of the application, how it looks and functions, is defined as metadata and stored in a database. That is, the application you build in the Force.com platform is not using any programming language. Instead, the "source code" for the application is considered as data and stored in the database. This includes everything - user interface, business logic, process automation rules, any custom code, data model configuration and anything and everything related to your application. When the application is accessed by the end user, the application is rendered simply by reading the metadata.

The application development using the platform's point and click method of development results into metadata. The platform also exposes metadata API to allow for programmatically managing the application. The API allows you to create and modify metadata components.

More exploring in future articles.

Happy cloud computing using Salesforce!